How to File a Window Warranty Claim? – It’s easy.

If you have a house with windows there’s a good chance sooner or later you’ll want to get something fixed. Of course you can always pay to have your windows replaced, but the window warranty may be another solution.

Every window that I’ve ever seen has come with a warranty. Now, before you get your hopes up you should know that some warranties are more limited than others. You may be able to get your windows fixed easily through the warranty but you may not.

Windows used in new construction often come with shorter warranties than replacement winnows. New construction windows also often have warranties that are not transferable. If you didn’t build the house you might be out of luck.

There are several reasons that you might not be able to use the window warranty to get your windows fixed up, but it’s worth a try.

Step 1: Who installed your windows?

If you know who installed your windows you’re off to a good start. Your best bet is to contact them. Let them know what issue you’re having and they should be able to point you in the right direction.

Either they’ll be able to help you or they’ll be able to help you get started in finding a solution. As long as the window manufacturer hasn’t gone out of business and the warranty hasn’t expired you’re probably in good shape.

There might be a cost to fix your issue, it might be free, but they’ll be able to offer a solution.

Step 2: Who manufactured your windows?

If the company you bought the windows from has vanished (sadly this happens a lot) or if you don’t know who installed your new windows the next step is to look for the manufacturer of the windows.

Sometimes it’s easy to tell who made your windows, but sometimes it’s a little challenging. To their credit, large companies like Andersen or Jeld-Wen will often etch their logo into the corner of the glass. This makes identifying the manufacturer easy.

Unfortunately, some manufacturers will make it harder to find this info. They tend to leave any identifying information off of the window itself. That way future owners won’t know who made the window and won’t be able to use the warranty.

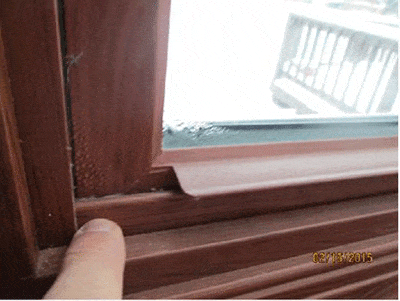
Before you give up and decide you don’t know who made the windows, you might want to do a little looking. If you have double hung windows that open up and down, try lowering the top sash and looking up into the frame. There’s a decent chance you’ll find a window warranty sticker. That sticker will have info that might help you get your problem solved.

For casement windows that crank outwards or sliding windows that slide side to side the sticker is usually in about the same place. Open the window and look up into the frame or down on top of the sash. If you can find a sticker with identifying info you’ll be in good shape.

Step 3: Contact the window manufacturer’s warranty department

Google is your friend at this point. Just lookup the manufacturer and you’ll likely find window warranty info on their website. You should be able to contact them and they’ll have a process for a warranty claim.

Pro tip: Before you file a warranty claim see if they can send you a copy of the warranty the would apply to your windows. Read it and understand the limitations. Use that info to frame your claim.

The process may seem long or overly challenging, but your life will be easier if you just follow their steps and give them the info they ask for. The person you’re dealing with is just following the rules so be polite and they’ll help you as much as they can.

Soon we’ll be updating posts with information on the warranty claim process for individual manufacturers. We’re going to start with the companies below and we can add any others. If you’re having trouble with one just let us knwo and we’ll see if we can help out.

Window warranty claim process:

  • Alside Window Warranty
  • Andersen Window Warranty
  • Great Lakes Window Warranty
  • Marvin Window Warranty
  • Mi Window Warranty
  • Okna Window Warranty
  • Pella Window Warranty
  • Revere Window Warranty
  • Simonton Window Warranty
  • Soft-Lite Window Warranty
  • Sunrise Window Warranty

Step 4: What if your window warranty claim is denied?

If your warranty claim is denied you’ll want to look at the reasoning to decide how to respond. For example, if the warranty is denied because it was a 10 year warranty and the windows were installed 15 years ago you should just let it go. You have no warranty.

We see people posting comments on the site who are all upset about a warranty claim getting denied when they have no warranty anyway. Don’t be that guy. If the warranty wasn’t transferable and you’re the second owner then you don’t have a warranty. You can be as mad about that as you want but you’re wasting your energy. Just move on.

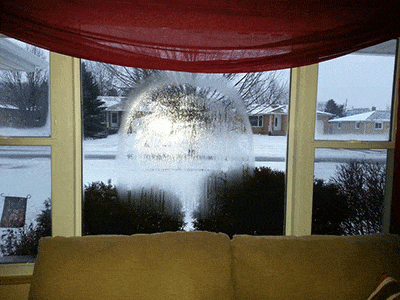
Warranty claims are often denied because the problem is installation related rather than product related. This happens all the time. We see people who are all upset about a warranty claim that was denied for a leaking window or a crooked window or a window that won’t close. Any of those could be manufacturing issues, but if they’re not then you’ll need to deal with the company that installed them.

If you don’t know who that company is or you don’t like them or they’re gone then there may be little you can do.

It’s important to keep this in mind when you’re filing your initial claim. You want to try to look to see what the issue is and make sure it appears to be a manufacturing issue. Once they’ve denied your claim it will be challenging or impossible to get them to change their minds.

Step 5: What if your claim is approved?

If your warranty claim is approved you’re in great shape. The manufacturer will be able to let you know how the parts will be shipped. You may be responsible for shipping costs. They can probably show you how to install them or direct you to an installer.

To find our company or other recommended companies in your area check this section. You can also find window reviews here and information about the tricky window sales tactics that many companies uses here. We hope you enjoy the site!

Why do I get moisture on my windows?

Why do I get moisture on my windows? 

When it comes to new windows, this is a very common question.  It is also a very common phenomenon.  In fact, most manufacturers have great information on their websites about condensation (moisture), what causes it, and how to prevent it.  If you have moisture on your new windows, don’t worry!  Even the best windows out there will get condensation on them if certain environmental conditions allow for it.

condensation or moisture on windows
Here you can see condensation on the inside of new replacement windows.

Usually a person’s first fear when seeing condensation is that something is wrong with their beautiful new windows.  Although the moisture may be ugly, it might actually be a sign of a good thing – a proper seal.  Since there are a lot of factors that go in to why condensation occurs, the important thing is to be open and understanding that the moisture may be a consequence of something other than the new window.

Here are the main factors that contribute to condensation on a window:

  • Exterior temperature
  • Interior temperature
  • Interior humidity levels
  • Interior ventilation

 Minimizing Condensation

I’ve never been great at physics or science in general, so I will not get in to the reasons that cause condensation other than mentioning the conditions that must be present to cause it – humidity and contrasting temperatures.  If your windows are getting condensation on them and you’d like to stop it or minimize it, here are some tips:

  • Open your blinds/curtains.  Trapping moisture in an area that is colder will certainly lead to condensation.  Keeping blinds and curtains closed will prevent air flow.  Of course, privacy might be more important than a little water on your windows so I understand if this isn’t a viable option.  The sacrifice will be to wipe down those windows daily, at least for part of the year.
  • Run a fan.  This is important especially in bathrooms and kitchens.  Whenever you’re cooking or showering moisture is evaporating in to the air.  Keeping good air flow during and after these activities will keep that moist air from moving toward the windows and condensing.
  • Adjust humidity levels as seasons change.  Most whole house humidifiers have a setting that can be adjusted.  If you don’t use a whole house humidifier but run a different type, it might make sense to buy a hydrometer.  They cost about $11.00.  As a quick guide, humidity levels in the winter should be about 25%-30% with indoor temperatures between 65 and 70 degrees and 25%-60% in the summer with indoor temperatures between 72 and 80 degrees.
  • Open your windows.  Sure, when it’s 7 degrees outside you might not want to do that (although it will help), but when it’s nicer outside or when you’re showering, cracking the window a little will help with air flow and will let moisture move toward the colder outside air.
  • If your house is very “air tight” and if you have a forced air furnace, it might be good to look in to installing an air-to-air heat exchanger.  This will help properly ventilate your home.  Of course, an HVAC expert would be more helpful than I would in that category.

The list above will help with some common condensation questions.  Over the years I’ve seen some oddballs too.  Below is a great picture of what happens when a furnace vent is pointed at a window.  To solve this, a deflector that routes air in to the middle of the room solved the problem.

condensation on picture window
You can see the effect of the vent being pointed at the window.

Another much less common condensation issue has to do with moisture on the outside of the window.  I’ve only ever seen this when 4 conditions apply – it is summer, outside temperatures drastically warm up overnight, a water source (like a pond) is nearby, and A/C is running.

condensation or moisture on patio door.
Here you can see condensation that has formed on the outside of a sliding patio door.

This makes it very difficult to enjoy a beautiful morning, but don’t worry, the sun will rise and the moisture will evaporate away.  To not have this happen, I imaging turning off the A/C would have been the solution.

Sam Steinacker is one of the owners of Window Universe in Cleveland.  Sam has many years of experience in the window industry working in manufacturing, distribution and sales.  He knows windows inside and out.  If you’re anywhere in Northeast Ohio you should give Window Universe a ring.  

How to Repair Foggy Windows – It’s pretty easy!

One of the most common calls we get in the office is from folks looking to repair foggy windows.  I think we’ve all seen what this looks like, but just in case, here’s a picture of the window dog himself  trying to look for intruders through a foggy double pane window.  It’s not easy to see the bad guys coming!

fix a window seal failure
The little fella works so hard to keep us safe. The least we can do is provide him with a clear view!

This happens when the seal fails allowing outside air into the glass unit.  That air brings moisture with it and instantly you’ll see condensation or a film on the glass.  This is ugly and it’ll never go away by itself.

Luckily for you we’ve made a quick video demonstrating how we fixed this problem.  Enjoy!

It is important to note that even after your window is repaired it’s still an old window.  You may find that replacing the window doesn’t cost much more than the repair and in that scenario you’d get a whole new window.

In this case, this is a wood 3-lite casement window with a clad exterior.  The cost to replace this window would likely be over $2,000 so a repair makes sense and the results were fantastic.

fixed glass in replacement window
Now thats better. Frisco has a much better view and those pesky deer don’t stand a chance!

Now we’re still having some trouble with this window.  The old cranks are a little shaky and it just doesn’t operate as well as a shiny new window would.  It’ll probably get replaced sooner or later, but this repair will give it several more years of life and the whole room looks much better.

If you’re thinking about repairing your existing windows it certainly is possible although not always as easy as it looks.  Replacing a sealed insulated glass unit in a vinyl replacement window can be tricky because the vinyl trim pieces can be brittle and if they break you may have a very hard time finding a replacement.  We’ll have another video coming out soon on repairing or replacing glass in a vinyl replacement window.

Why am I having a hard time finding a company to do this?

Because it’s a bit of a hassle for the amount of money folks will pay.  A professional may have a tool to measure the glass without removing it, but still you’re talking about 2 trips to the house, a few hours of work and taking the risk that something breaks or some unexpected problem arises.  Factor in the driving time, the ordering, picking up the glass and this quickly turns to a project that requires many hours of work.

If you’re looking to pay $50 for someone to do this you’re going to have a real hard time.  It’ll probably cost several hundred dollars to hire a professional, but if you’re comfortable tackling it yourself you could get it done for much less.